Build a custom generator
2. Setup
This codelab will demonstrate how to add code to the Blockly sample app to create and use a new generator.
The application
Use the npx @blockly/create-package app command to create a standalone application that contains a sample setup of Blockly, including custom blocks and a display of the generated code and output.
- Run
npx @blockly/create-package app custom-generator-codelab. This will create a blockly application in the foldercustom-generator-codelab. cdinto the new directory:cd custom-generator-codelab.- Run
npm startto start the server and run the sample application. - The sample app will automatically run in the browser window that opens.
The initial application has one custom block and includes JavaScript generator definitions for that block. Since this codelab will be creating a JSON generator instead, it will remove that custom block and add its own.
The complete code used in this codelab can be viewed in the blockly repository under docs/docs/codelabs/custom-generator.
Before setting up the rest of the application, change the storage key used for this codelab application. This will ensure that the workspace is saved in its own storage, separate from the regular sample app, so that it doesn't interfere with other demos. In serialization.js, change the value of storageKey to some unique string. jsonGeneratorWorkspace will work:
// Use a unique storage key for this codelab
const storageKey = 'jsonGeneratorWorkspace';
Blocks
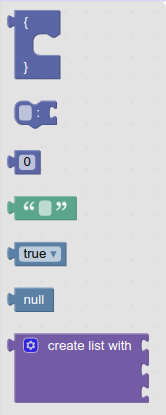
This codelab will use two custom blocks, as well as five blocks from Blockly's standard set.
The custom blocks represent the Object and Member sections of the JSON specification.
The blocks are:
objectmembermath_numbertextlogic_booleanlogic_nulllists_create_with
Custom block definitions
Create a new file in the src/blocks/ directory called json.js. This will hold the custom JSON-related blocks. Add the following code:
import * as Blockly from 'blockly';

export const blocks = Blockly.common.createBlockDefinitionsFromJsonArray([
  {
    type: 'object',
    message0: '{ %1 %2 }',
    args0: [
      {
        type: 'input_dummy',
      },
      {
        type: 'input_statement',
        name: 'MEMBERS',
      },
    ],
    output: null,
    colour: 230,
  },
  {
    type: 'member',
    message0: '%1 %2 %3',
    args0: [
      {
        type: 'field_input',
        name: 'MEMBER_NAME',
        text: '',
      },
      {
        type: 'field_label',
        name: 'COLON',
        text: ':',
      },
      {
        type: 'input_value',
        name: 'MEMBER_VALUE',
      },
    ],
    previousStatement: null,
    nextStatement: null,
    colour: 230,
  },
]);
This code creates the block definitions, but it doesn't register the definitions with Blockly to make the blocks usable. We'll do that in src/index.js.
Currently, the app imports blocks from the original sample file, text.js. Instead, it should import the definitions that were just added. Remove the original import:
// Remove this!
import { blocks } from './blocks/text';
and add the import for the new blocks:
import { blocks } from './blocks/json';
Later in the file the block definitions are registered with Blockly (this code is already present and does not need to be added):
Blockly.common.defineBlocks(blocks);
Toolbox definition
Next, define a toolbox that includes these custom blocks. For this example, there's a flyout-only toolbox with seven blocks in it.
The file src/toolbox.js contains the original sample toolbox. Replace the entire contents of that file with this code:
export const toolbox = {
  kind: 'flyoutToolbox',
  contents: [
    {
      kind: 'block',
      type: 'object',
    },
    {
      kind: 'block',
      type: 'member',
    },
    {
      kind: 'block',
      type: 'math_number',
    },
    {
      kind: 'block',
      type: 'text',
    },
    {
      kind: 'block',
      type: 'logic_boolean',
    },
    {
      kind: 'block',
      type: 'logic_null',
    },
    {
      kind: 'block',
      type: 'lists_create_with',
    },
  ],
};
Our index.js file already handles importing the toolbox and using it in Blockly.
If the server is already running, refresh the page to see changes. Otherwise, run npm start to start the server. New blocks should now exist in the toolbox, like this:
The app is still trying to generate and run JavaScript for the workspace, instead of JSON. We will change that soon.